
How to install WordPress on cPanel
[ad_1]
Step 2: Open the File manager >> and upload the file from your Local Computer.
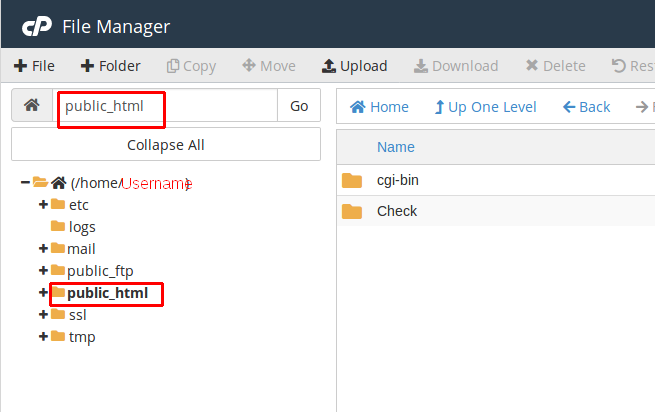
If you are going to install the WordPress For the Primary Domain Name then you need to Upload your File In the default directory “public_html”
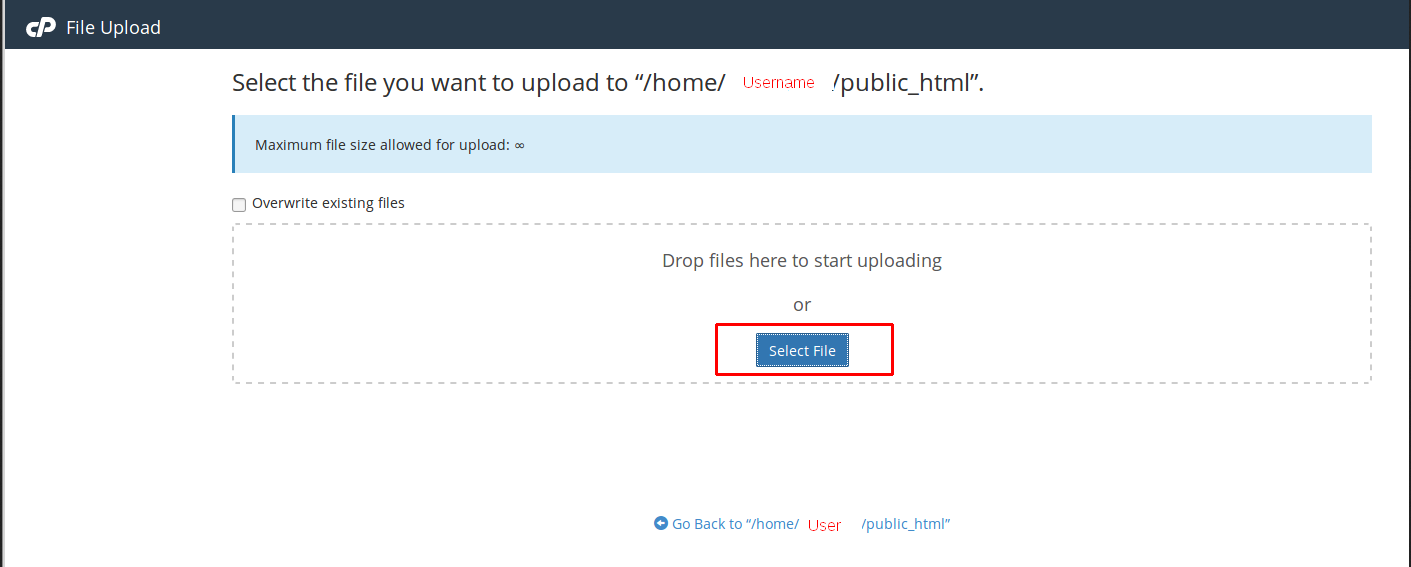
 Step 3: Click on the Upload >> select the file which has to be uploaded >> After Once upload you need to Extract the File in the File Manager.
 Method 2: Upload the Wordpress.zip file in your File manager Using FTP.
You can connect your Hosting account Directory using the FTP.
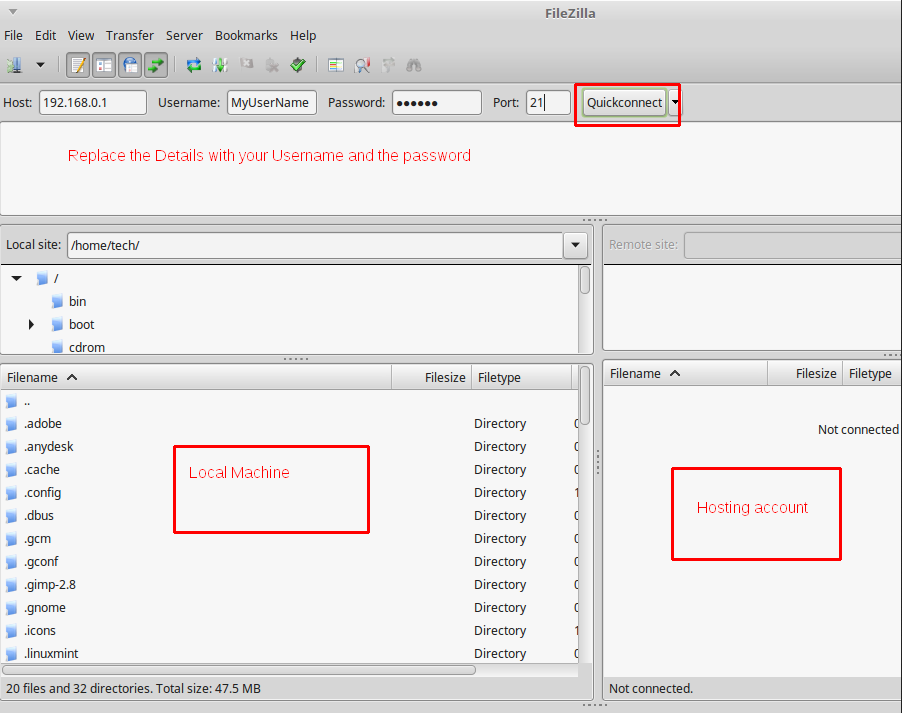
The required FTP Details
Host: server IP(You can refer the server details, in your welcome email)
User: MyUserName
Pass: MyPass
Port: 21 By default the Port number will be 21, Some case if you are using SFTP the port will be 22.
You can use the Filezilla tool to connect your hosting account using the FTP, you can refer the below screen
Method 2: Upload the Wordpress.zip file in your File manager Using FTP.
You can connect your Hosting account Directory using the FTP.
The required FTP Details
Host: server IP(You can refer the server details, in your welcome email)
User: MyUserName
Pass: MyPass
Port: 21 By default the Port number will be 21, Some case if you are using SFTP the port will be 22.
You can use the Filezilla tool to connect your hosting account using the FTP, you can refer the below screen
 Now the file is uploaded into the File manager.
Step 3: After the file is uploaded in file manager >> Extract the Wordpress.zip file from File Manager. To extract the file follow the below steps :
Step 3.1: Go to file manager >> to public_html or the directory where you have uploaded the wordpress.zip file, >> right-click on the folder
Now the file is uploaded into the File manager.
Step 3: After the file is uploaded in file manager >> Extract the Wordpress.zip file from File Manager. To extract the file follow the below steps :
Step 3.1: Go to file manager >> to public_html or the directory where you have uploaded the wordpress.zip file, >> right-click on the folder
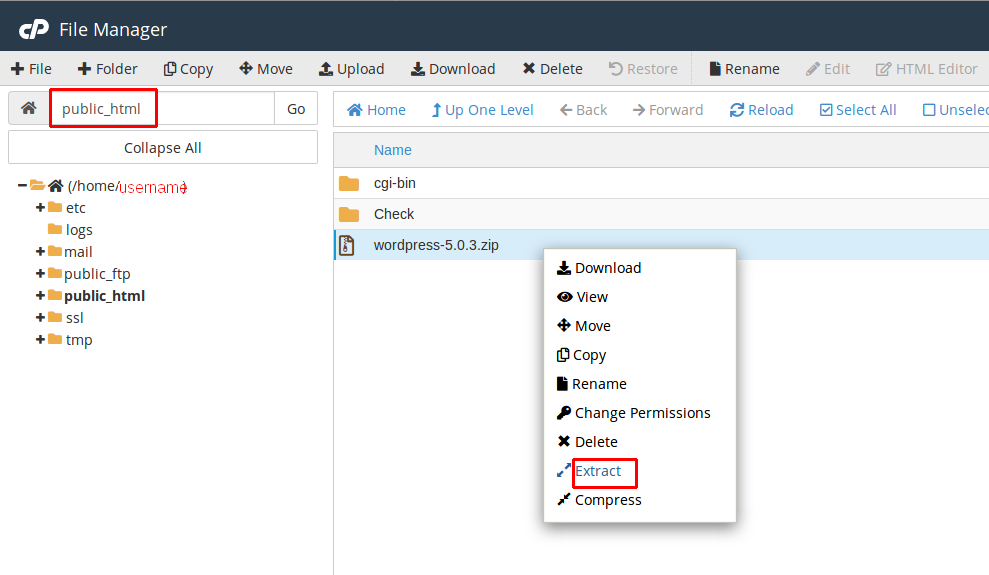 Step 3.2: Select and click-on Extract from the menu as shown in the above figure.
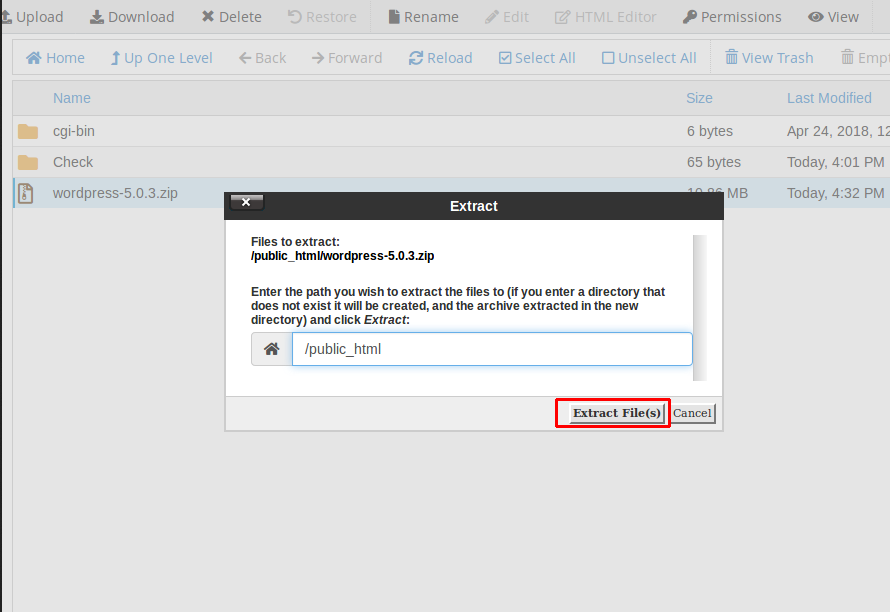 Step 3.3: After you click on extract >> you need to enter the directory to which the files should be extracted >> and click on extract files to extract the files >> Once you click in the Extract File it will be extracted as below >> click on close and proceed to the next step
Step 4: Now we have Extracted the File Successfully, But if you check the Screen the File will be extracted in public_html/WordPress. So You have to access the website by http://domain.com.np/wordpress.
To move the files from WordPress to the domain_name directory /public_html, Follow the below steps:
Step 4.1: To Move the Files From WordPress Directory to Public_html which is parent Directory., You need to Select all the Files from the public_html/WordPress and click on Move as shown below
Step 3.3: After you click on extract >> you need to enter the directory to which the files should be extracted >> and click on extract files to extract the files >> Once you click in the Extract File it will be extracted as below >> click on close and proceed to the next step
Step 4: Now we have Extracted the File Successfully, But if you check the Screen the File will be extracted in public_html/WordPress. So You have to access the website by http://domain.com.np/wordpress.
To move the files from WordPress to the domain_name directory /public_html, Follow the below steps:
Step 4.1: To Move the Files From WordPress Directory to Public_html which is parent Directory., You need to Select all the Files from the public_html/WordPress and click on Move as shown below
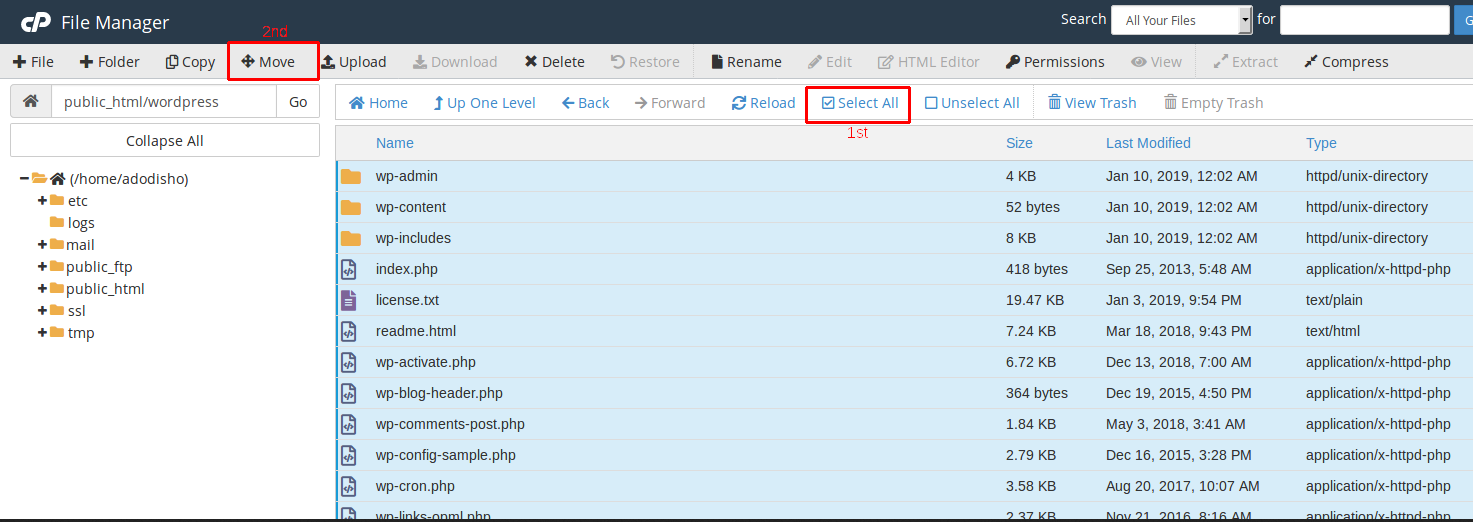 Step 4.2: After you click on move files, select the path >> So that the WordPress Files will move. You need to enter the Parent Directory “Public_html” if its a primary domain >> and click on move files. Now we have successfully moved the File to the Parent Directory.
Step 5: Next, Create a Database and its User.
To Install the WordPress Website You need a Database So now we will Create the Database and Database User.
Step 5.1: Login to the Cpanel ===> Mysql Databases
Step 4.2: After you click on move files, select the path >> So that the WordPress Files will move. You need to enter the Parent Directory “Public_html” if its a primary domain >> and click on move files. Now we have successfully moved the File to the Parent Directory.
Step 5: Next, Create a Database and its User.
To Install the WordPress Website You need a Database So now we will Create the Database and Database User.
Step 5.1: Login to the Cpanel ===> Mysql Databases
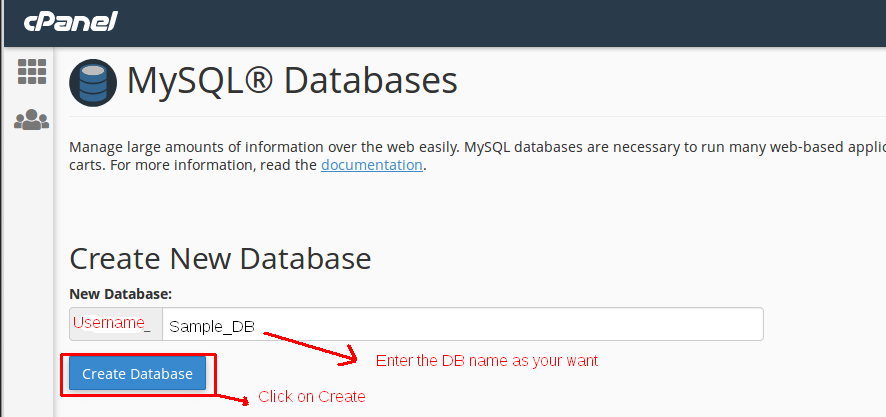
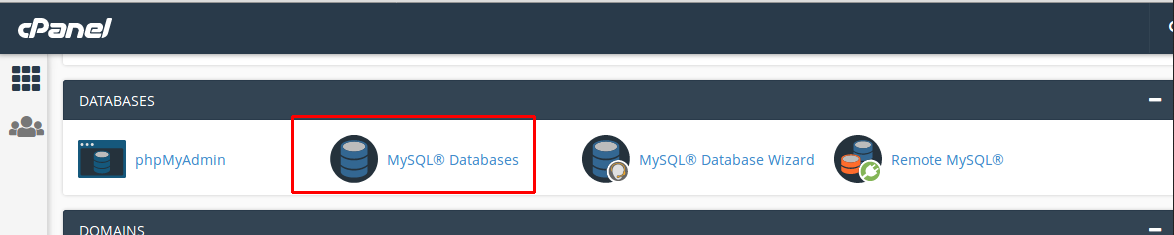 Step 5.2: You can enter the Databases name as you wish you can give any or project name.You can refer the below screen.
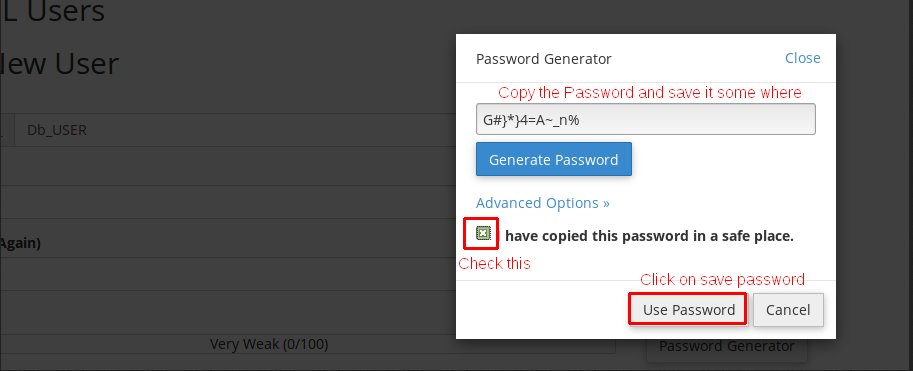
 Step 5.3: Once creating a Database now you need to create Database User.
You can also generate the password using the password generator.
Step 5.3: Once creating a Database now you need to create Database User.
You can also generate the password using the password generator.
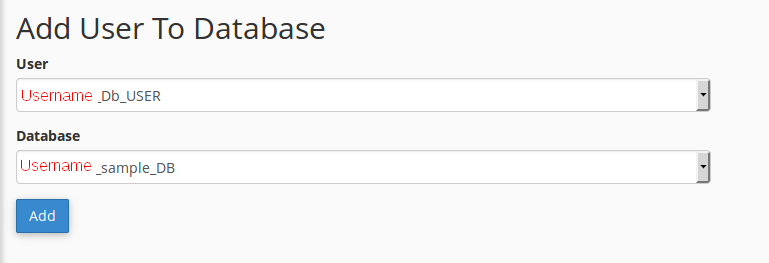
 Step 5.4: Now the Database and its User is created, the next thing to connect Database with its username, You can refer the below screen and add the database
 Step 5.5: We are adding the database and its username for assigning the Privileges to DB.
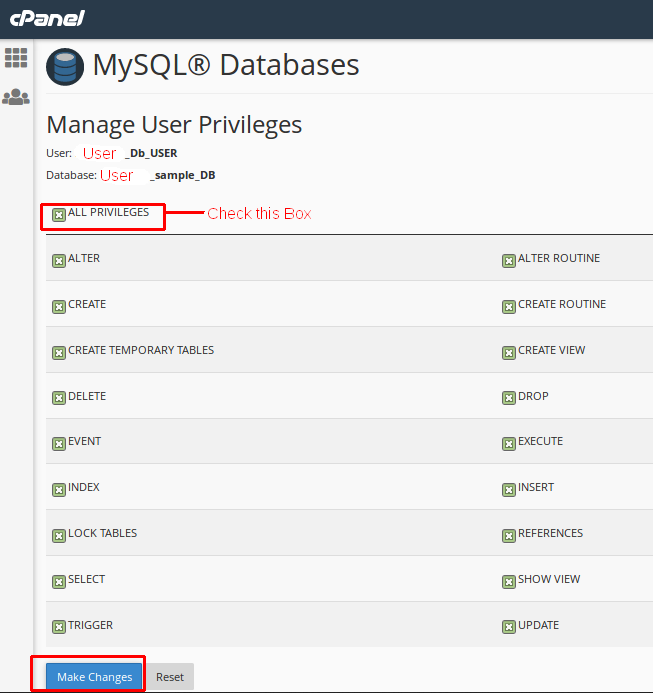 Now we have done with creating the Database and its username and assigned Necessary privileges for the DB.
Step 6: The last step is to configure this wp-config file in the File manager.
Step 6.1: Open the File manager >> Edit the Wp-config.php file.
You may not find the file wp-config.php so you need to Rename the file wp-config-sample.php to wp-config.php as shown in the below screen.
Now we have done with creating the Database and its username and assigned Necessary privileges for the DB.
Step 6: The last step is to configure this wp-config file in the File manager.
Step 6.1: Open the File manager >> Edit the Wp-config.php file.
You may not find the file wp-config.php so you need to Rename the file wp-config-sample.php to wp-config.php as shown in the below screen.
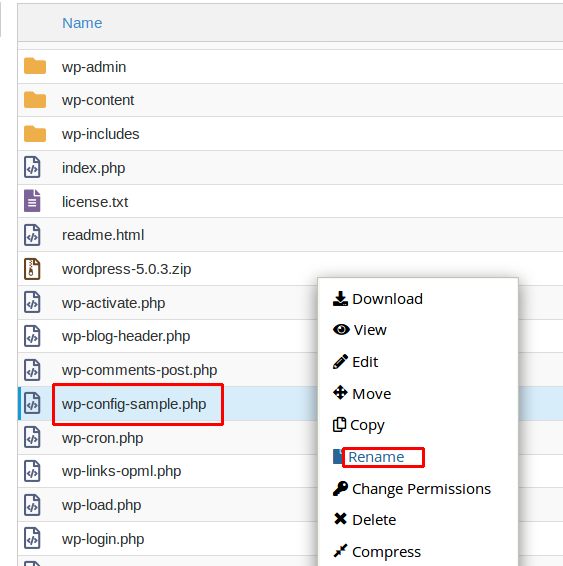 Step 6.2: Rename the File to wp-config.php
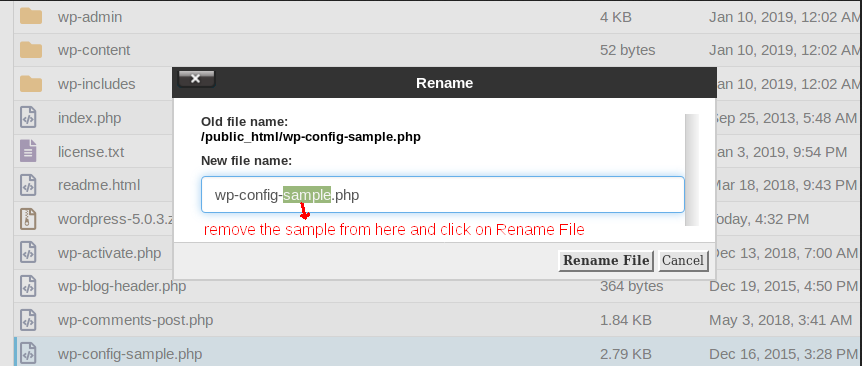 Step 6.3: After Renaming it, you need to edit the file wp-config.php >>Click on Edit
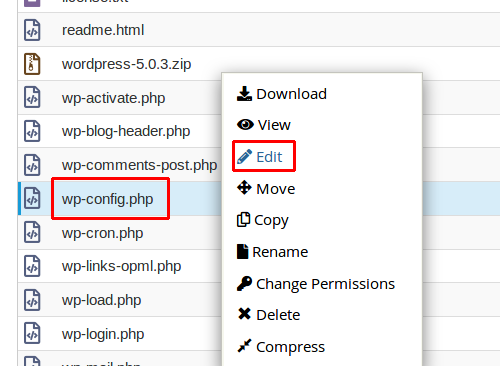 Click on Edit
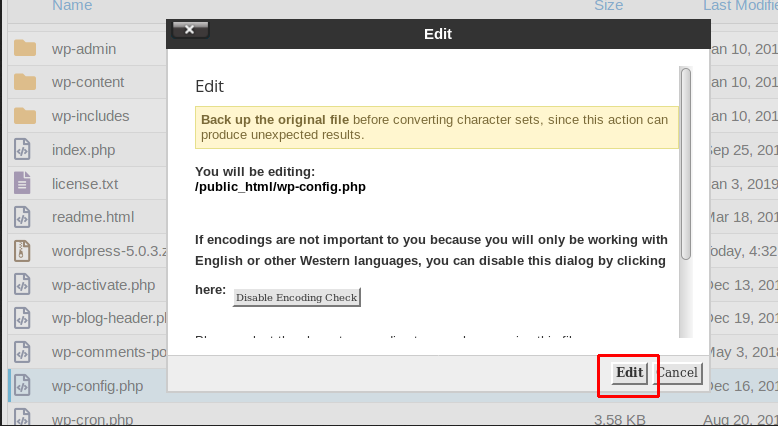 Step 6.4: Now you need to do the Changes in your wp-config file.
Step 6.5: You can replace the Values with your Database details and click on save.
Step 6.4: Now you need to do the Changes in your wp-config file.
Step 6.5: You can replace the Values with your Database details and click on save.
 Now the Setup is done, you can access the domain name you will see the below screen.
Step 7: Install the WordPress in Domain name
URL: http://domainname.com.np/wp-admin/install.php
Now the Setup is done, you can access the domain name you will see the below screen.
Step 7: Install the WordPress in Domain name
URL: http://domainname.com.np/wp-admin/install.php
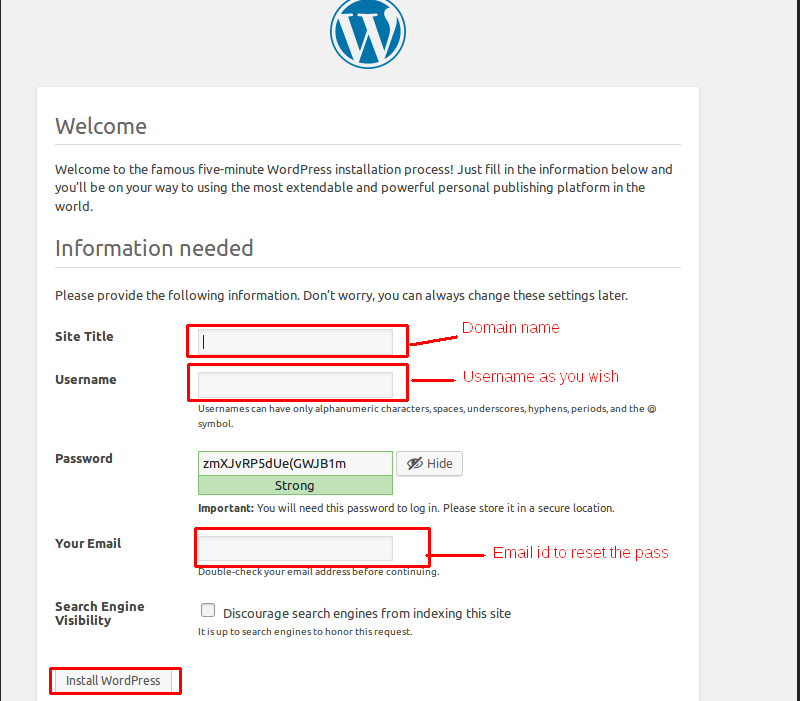
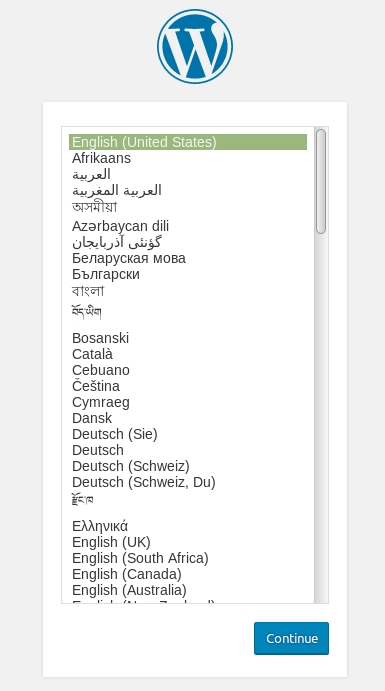 Step 7.1: Click on continue and follow the next steps. Enter all the details and click on the install WordPress will be installed.
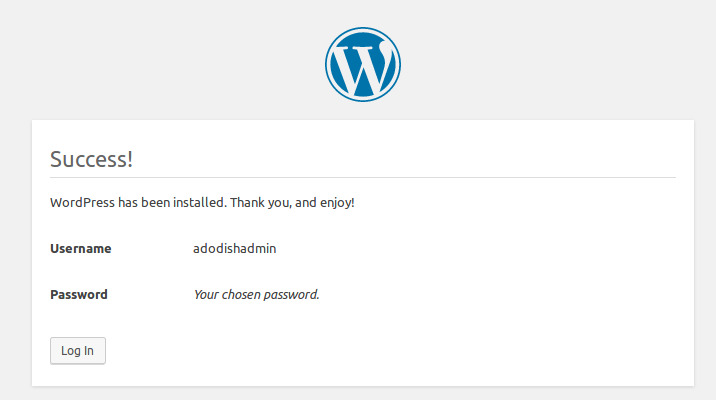
 Step 7.2: WordPress is successfully installed.`
 Following the above steps, you can manually install WordPress for your domain
You can also easily install WordPress using Softaculous Apps installer. Refer to the below steps to install WordPress for domain
Following the above steps, you can manually install WordPress for your domain
You can also easily install WordPress using Softaculous Apps installer. Refer to the below steps to install WordPress for domain
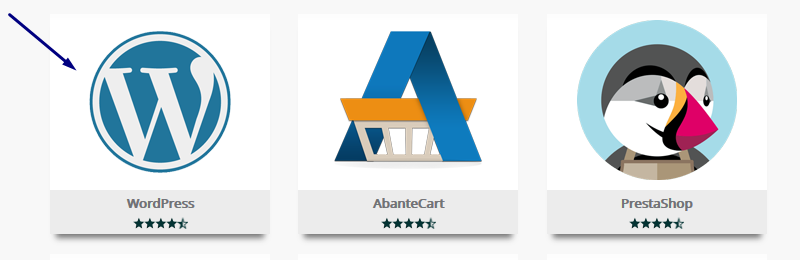
 Step 3: Click on the WordPress icon, this will open several options like features, overview, and steps to install WordPress.
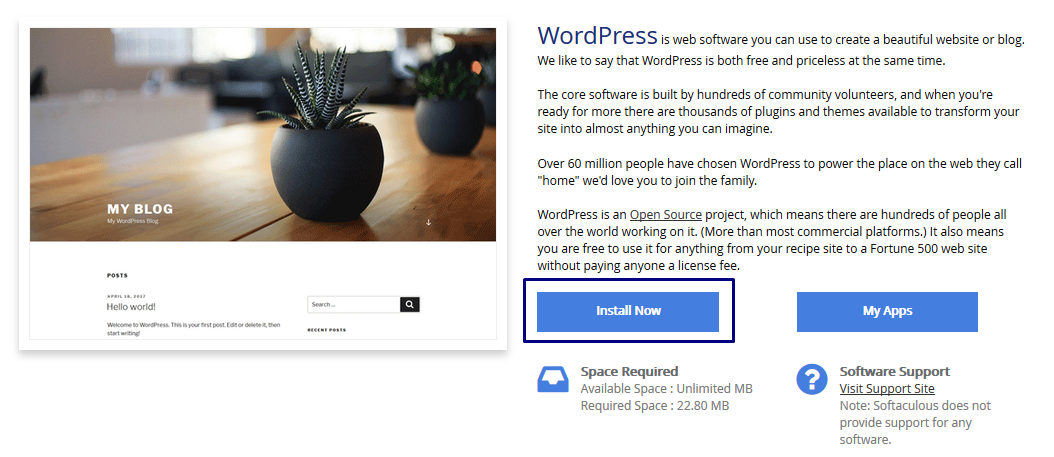
 Step 4: The brief overview, features are given about WordPress. Click on Install to get the details of WordPress installation.
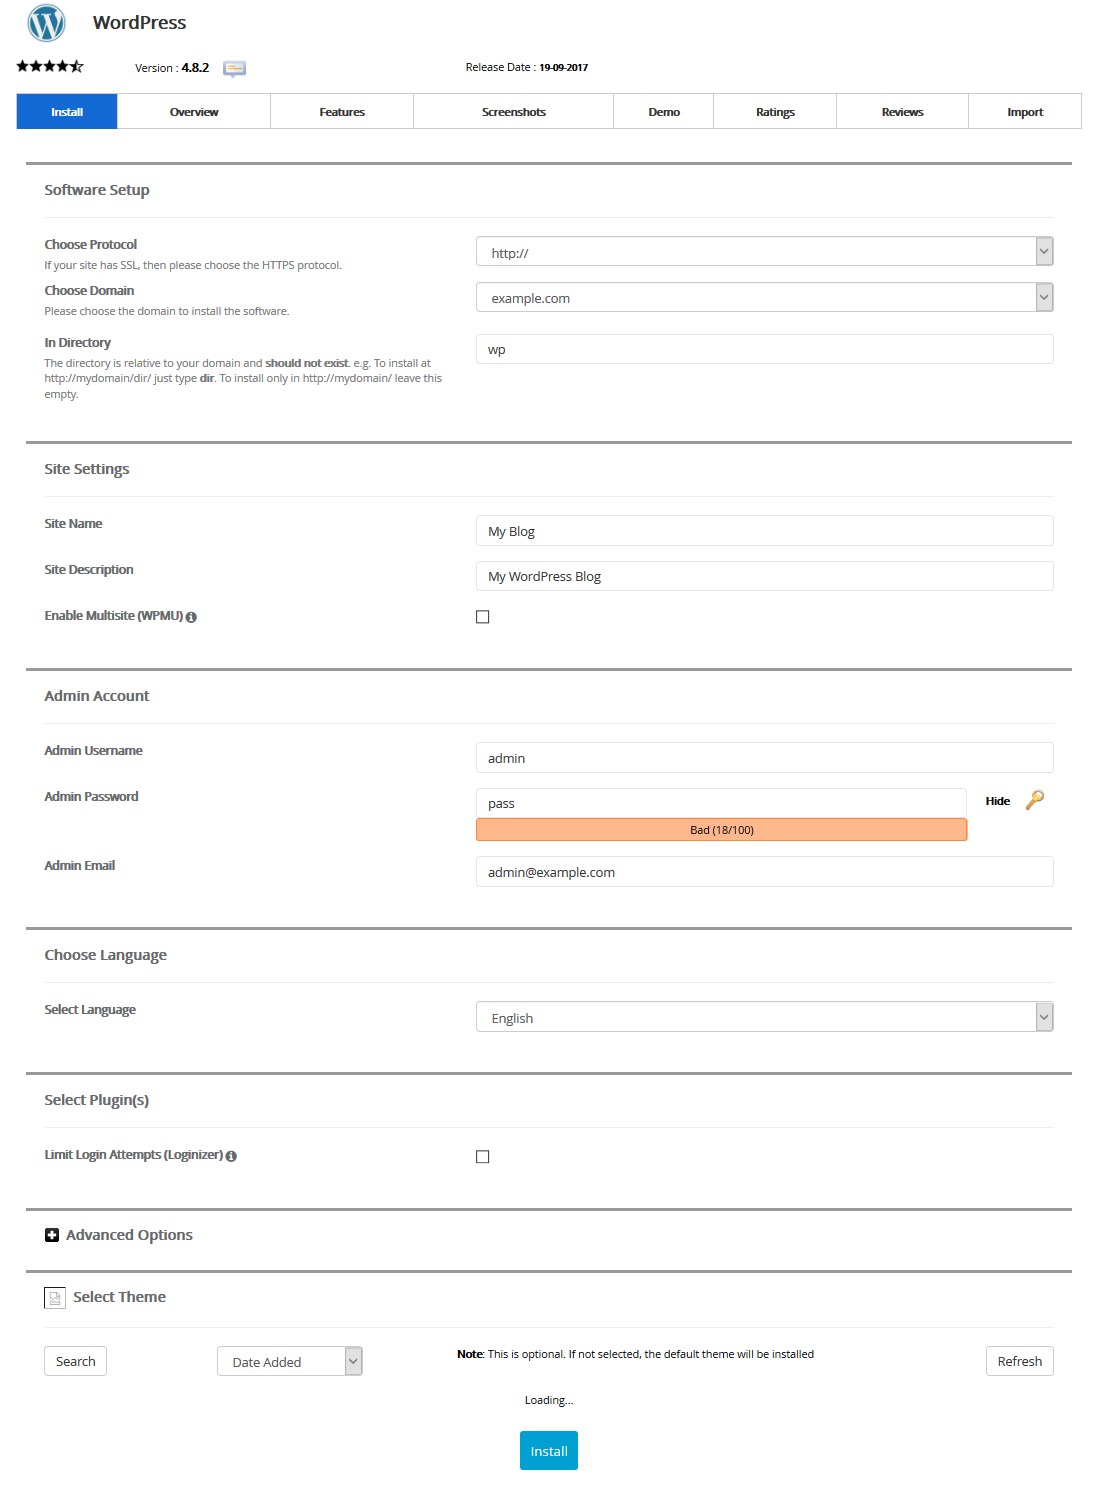
 Step 5: Complete the WordPress setup information. The below necessary required information you need to be filled.
Choose Protocol: If your website has installed SSL certificate, then choose 'HTTPS', if not choose 'HTTP' protocol.
Choose Domain: If your hosting panel has multiple domains, then choose the name of the domain which you would like to install WordPress.
In Directory: Leave a blank column, so that WordPress will be installed directly on your domain.
If you're installing sub-folder like 'wp', then your website will not load directly. This will make your website load with folder name like "example.com/wp"
Admin Username: Enter a username of your WordPress Dashboard.
Admin Password: Enter a Password of your WordPress Dashboard login.
Admin Email: Enter a valid email address.
Step 5: Complete the WordPress setup information. The below necessary required information you need to be filled.
Choose Protocol: If your website has installed SSL certificate, then choose 'HTTPS', if not choose 'HTTP' protocol.
Choose Domain: If your hosting panel has multiple domains, then choose the name of the domain which you would like to install WordPress.
In Directory: Leave a blank column, so that WordPress will be installed directly on your domain.
If you're installing sub-folder like 'wp', then your website will not load directly. This will make your website load with folder name like "example.com/wp"
Admin Username: Enter a username of your WordPress Dashboard.
Admin Password: Enter a Password of your WordPress Dashboard login.
Admin Email: Enter a valid email address.
 Step 6: Once all the information filled, click on the install button to install WordPress. The WordPress installation may take 1-2 min of time. Please be patient until WordPress installation completes.
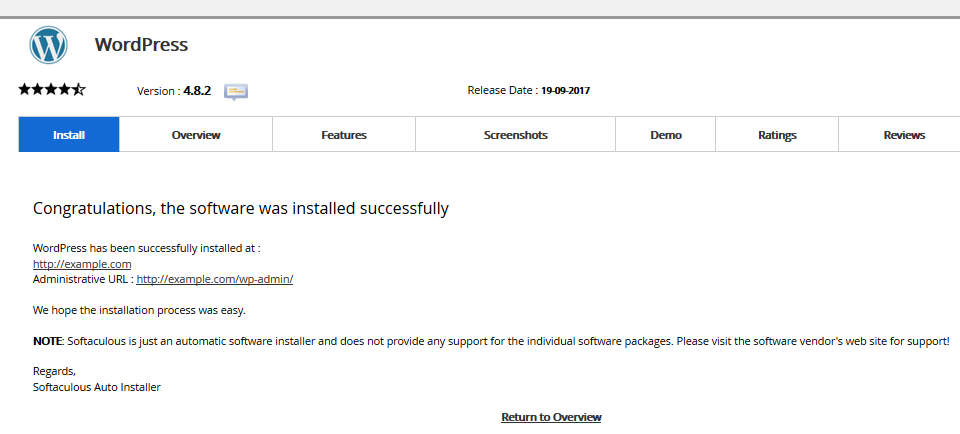
Step 7: Once WordPress installed, it will show WordPress admin login credentials with the dashboard URL.
Step 6: Once all the information filled, click on the install button to install WordPress. The WordPress installation may take 1-2 min of time. Please be patient until WordPress installation completes.
Step 7: Once WordPress installed, it will show WordPress admin login credentials with the dashboard URL.
 Step 8: Visit your website on the browser. Your website will show the WordPress default page.
Following the above step, you can easily install WordPress using the Softaculous apps installer
Step 8: Visit your website on the browser. Your website will show the WordPress default page.
Following the above step, you can easily install WordPress using the Softaculous apps installer
 Step 2: Click the delete icon (the red - Xicon )
Step 3: Then your app will be uninstalled.
Following the above, you can uninstall WordPress app.
If you need any assistance in this regard, you can contact us at http://www.hostingsewa.com/support/
Get the dedicated server hosting in Nepal offers only here
[ad_2]
Step 2: Click the delete icon (the red - Xicon )
Step 3: Then your app will be uninstalled.
Following the above, you can uninstall WordPress app.
If you need any assistance in this regard, you can contact us at http://www.hostingsewa.com/support/
Get the dedicated server hosting in Nepal offers only here
[ad_2]
What is WordPress?
WordPress is a free web publishing software you can use to create your own website or blog. Since it was released in 2003, WordPress has become one of the most popular web publishing platforms. Today it powers more than 70 million websites! Best of all, it’s completely FREE. HostingSewa provides free WordPress setup and Installation as part of WordPress services.Why do you need to choose WordPress?
- It is Free and Open Source and the most popular CMS (Content Management System).
- It is easy to use, and easy to install using the Softaculous app installer.
- It is most preferred CMS for the beginner, it is easy to learn.
- It is incredibly extensible with Plugins.
- Highly customizable for great flexibility.
- Design any website with WordPress CMS.
- WordPress is flexible with Multimedia.
How do install WordPress manually?
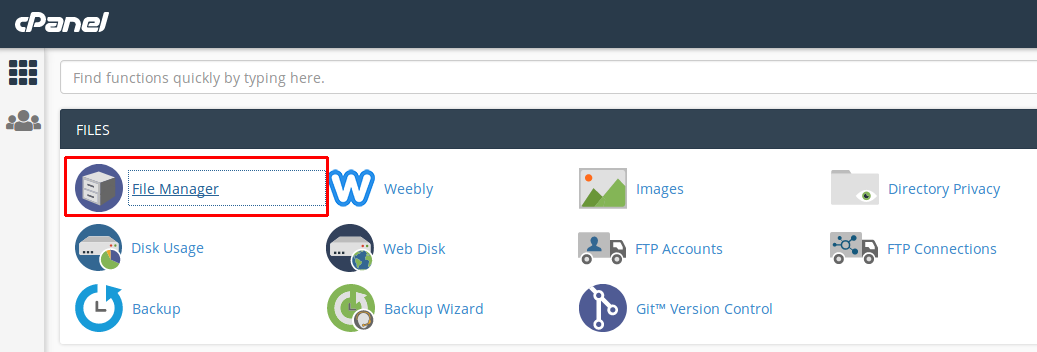
Step 1: Download the desired WordPress Version from the official WordPress website. https://wordpress.org/download/ You will get all the version from the Official website. Step 2: You can upload the WordPress files(Wordpress.zip file) into your hosting account, either by FileManager which comes with cPanel or use FTP to upload your files. Method 1: Upload theWordpress.zip file in your Cpanel File Manager. Step 1: Log in to Your Cpanel Account >> click on File Manager under files
Step 2: Open the File manager >> and upload the file from your Local Computer.
If you are going to install the WordPress For the Primary Domain Name then you need to Upload your File In the default directory “public_html”
Step 3: Click on the Upload >> select the file which has to be uploaded >> After Once upload you need to Extract the File in the File Manager.
Method 2: Upload the Wordpress.zip file in your File manager Using FTP.
You can connect your Hosting account Directory using the FTP.
The required FTP Details
Host: server IP(You can refer the server details, in your welcome email)
User: MyUserName
Pass: MyPass
Port: 21 By default the Port number will be 21, Some case if you are using SFTP the port will be 22.
You can use the Filezilla tool to connect your hosting account using the FTP, you can refer the below screen
Now the file is uploaded into the File manager.
Step 3: After the file is uploaded in file manager >> Extract the Wordpress.zip file from File Manager. To extract the file follow the below steps :
Step 3.1: Go to file manager >> to public_html or the directory where you have uploaded the wordpress.zip file, >> right-click on the folder
Step 3.2: Select and click-on Extract from the menu as shown in the above figure.
Step 3.3: After you click on extract >> you need to enter the directory to which the files should be extracted >> and click on extract files to extract the files >> Once you click in the Extract File it will be extracted as below >> click on close and proceed to the next step
Step 4: Now we have Extracted the File Successfully, But if you check the Screen the File will be extracted in public_html/WordPress. So You have to access the website by http://domain.com.np/wordpress.
To move the files from WordPress to the domain_name directory /public_html, Follow the below steps:
Step 4.1: To Move the Files From WordPress Directory to Public_html which is parent Directory., You need to Select all the Files from the public_html/WordPress and click on Move as shown below
 Step 4: Now we have Extracted the File Successfully, But if you check the Screen the File will be extracted in public_html/WordPress. So You have to access the website by http://domain.com.np/wordpress.
To move the files from WordPress to the domain_name directory /public_html, Follow the below steps:
Step 4.1: To Move the Files From WordPress Directory to Public_html which is parent Directory., You need to Select all the Files from the public_html/WordPress and click on Move as shown below
Step 4.2: After you click on move files, select the path >> So that the WordPress Files will move. You need to enter the Parent Directory “Public_html” if its a primary domain >> and click on move files. Now we have successfully moved the File to the Parent Directory.
Step 5: Next, Create a Database and its User.
To Install the WordPress Website You need a Database So now we will Create the Database and Database User.
Step 5.1: Login to the Cpanel ===> Mysql Databases
Step 5.2: You can enter the Databases name as you wish you can give any or project name.You can refer the below screen.
Step 5.3: Once creating a Database now you need to create Database User.
You can also generate the password using the password generator.
Step 5.4: Now the Database and its User is created, the next thing to connect Database with its username, You can refer the below screen and add the database
Step 5.5: We are adding the database and its username for assigning the Privileges to DB.
Now we have done with creating the Database and its username and assigned Necessary privileges for the DB.
Step 6: The last step is to configure this wp-config file in the File manager.
Step 6.1: Open the File manager >> Edit the Wp-config.php file.
You may not find the file wp-config.php so you need to Rename the file wp-config-sample.php to wp-config.php as shown in the below screen.
Step 6.2: Rename the File to wp-config.php
Step 6.3: After Renaming it, you need to edit the file wp-config.php >>Click on Edit
Click on Edit
Step 6.4: Now you need to do the Changes in your wp-config file.
Step 6.5: You can replace the Values with your Database details and click on save.
Now the Setup is done, you can access the domain name you will see the below screen.
Step 7: Install the WordPress in Domain name
URL: http://domainname.com.np/wp-admin/install.php
Step 7.1: Click on continue and follow the next steps. Enter all the details and click on the install WordPress will be installed.
Step 7.2: WordPress is successfully installed.`
Following the above steps, you can manually install WordPress for your domain
You can also easily install WordPress using Softaculous Apps installer. Refer to the below steps to install WordPress for domain
Step 4: Now we have Extracted the File Successfully, But if you check the Screen the File will be extracted in public_html/WordPress. So You have to access the website by http://domain.com.np/wordpress.
To move the files from WordPress to the domain_name directory /public_html, Follow the below steps:
Step 4.1: To Move the Files From WordPress Directory to Public_html which is parent Directory., You need to Select all the Files from the public_html/WordPress and click on Move as shown below
Step 4.2: After you click on move files, select the path >> So that the WordPress Files will move. You need to enter the Parent Directory “Public_html” if its a primary domain >> and click on move files. Now we have successfully moved the File to the Parent Directory.
Step 5: Next, Create a Database and its User.
To Install the WordPress Website You need a Database So now we will Create the Database and Database User.
Step 5.1: Login to the Cpanel ===> Mysql Databases
Step 5.2: You can enter the Databases name as you wish you can give any or project name.You can refer the below screen.
Step 5.3: Once creating a Database now you need to create Database User.
You can also generate the password using the password generator.
Step 5.4: Now the Database and its User is created, the next thing to connect Database with its username, You can refer the below screen and add the database
Step 5.5: We are adding the database and its username for assigning the Privileges to DB.
Now we have done with creating the Database and its username and assigned Necessary privileges for the DB.
Step 6: The last step is to configure this wp-config file in the File manager.
Step 6.1: Open the File manager >> Edit the Wp-config.php file.
You may not find the file wp-config.php so you need to Rename the file wp-config-sample.php to wp-config.php as shown in the below screen.
Step 6.2: Rename the File to wp-config.php
Step 6.3: After Renaming it, you need to edit the file wp-config.php >>Click on Edit
Click on Edit
Step 6.4: Now you need to do the Changes in your wp-config file.
Step 6.5: You can replace the Values with your Database details and click on save.
Now the Setup is done, you can access the domain name you will see the below screen.
Step 7: Install the WordPress in Domain name
URL: http://domainname.com.np/wp-admin/install.php
Step 7.1: Click on continue and follow the next steps. Enter all the details and click on the install WordPress will be installed.
Step 7.2: WordPress is successfully installed.`
Following the above steps, you can manually install WordPress for your domain
You can also easily install WordPress using Softaculous Apps installer. Refer to the below steps to install WordPress for domain
Steps to install WordPress on cPanel by using one-click installer 'Softaculous apps installer’ :
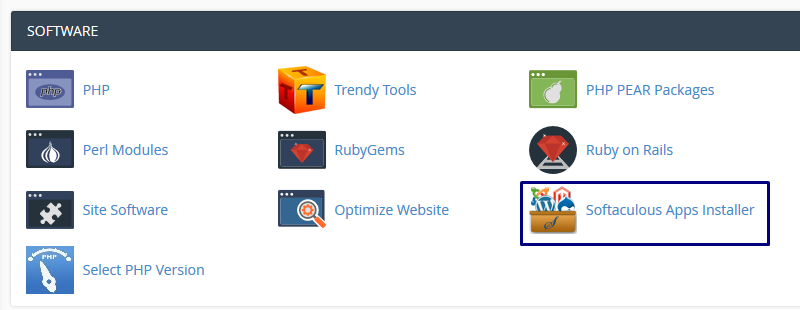
Step 1: Login into your cPanel. Step 2: On the Software Section >> Select Softaculous App Installer.
Step 3: Click on the WordPress icon, this will open several options like features, overview, and steps to install WordPress.
Step 4: The brief overview, features are given about WordPress. Click on Install to get the details of WordPress installation.
Step 5: Complete the WordPress setup information. The below necessary required information you need to be filled.
Choose Protocol: If your website has installed SSL certificate, then choose 'HTTPS', if not choose 'HTTP' protocol.
Choose Domain: If your hosting panel has multiple domains, then choose the name of the domain which you would like to install WordPress.
In Directory: Leave a blank column, so that WordPress will be installed directly on your domain.
If you're installing sub-folder like 'wp', then your website will not load directly. This will make your website load with folder name like "example.com/wp"
Admin Username: Enter a username of your WordPress Dashboard.
Admin Password: Enter a Password of your WordPress Dashboard login.
Admin Email: Enter a valid email address.
Step 6: Once all the information filled, click on the install button to install WordPress. The WordPress installation may take 1-2 min of time. Please be patient until WordPress installation completes.
Step 7: Once WordPress installed, it will show WordPress admin login credentials with the dashboard URL.
Step 8: Visit your website on the browser. Your website will show the WordPress default page.
Following the above step, you can easily install WordPress using the Softaculous apps installer
How to Uninstall the existing WordPress Website:
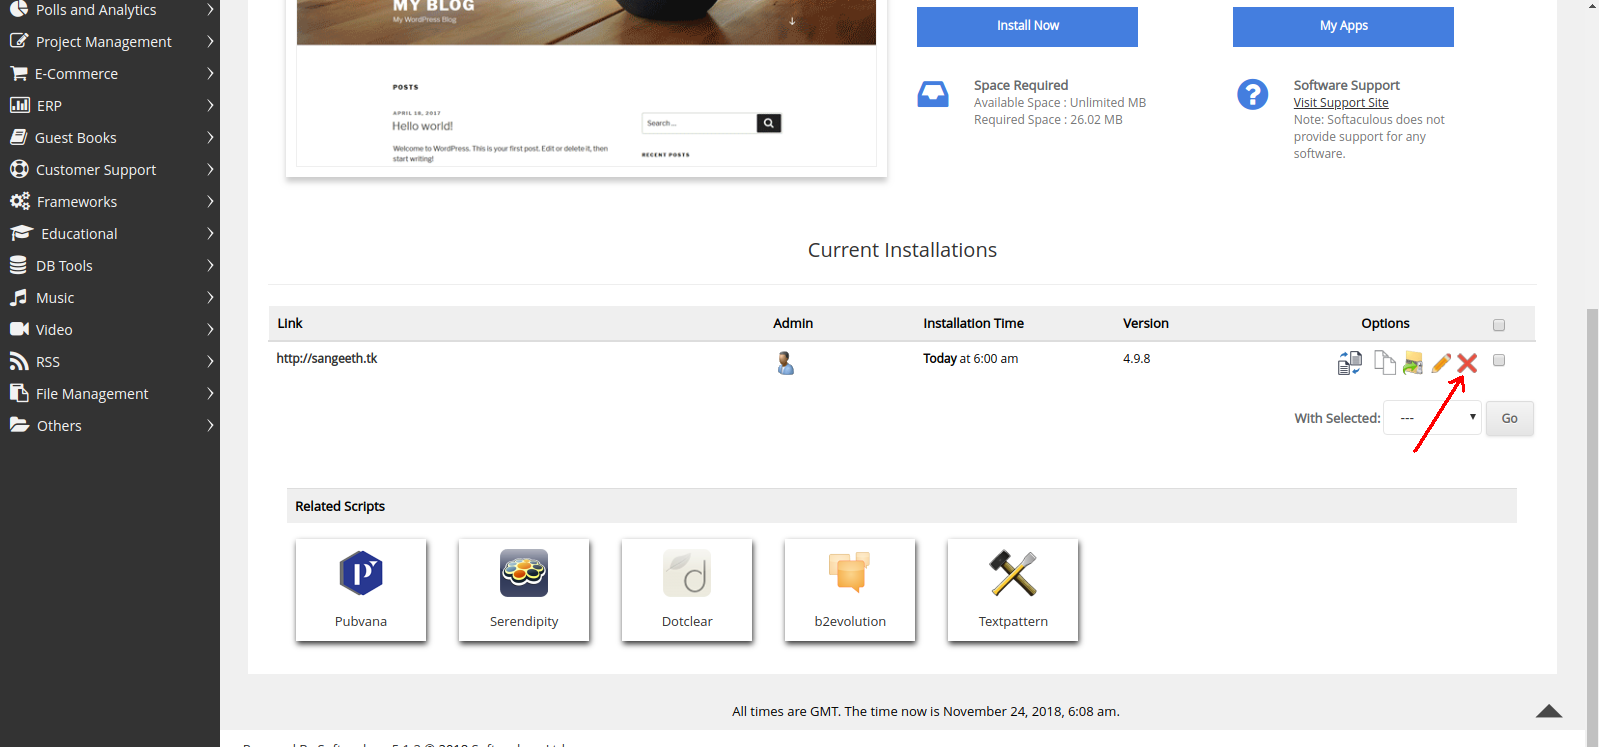
If you want to uninstall your existing WordPress website which is already installed, you can uninstall it using the below steps. Step 1: In WordPress panel >> the installed WordPress apps will be shown like below image
Step 2: Click the delete icon (the red - Xicon )
Step 3: Then your app will be uninstalled.
Following the above, you can uninstall WordPress app.
If you need any assistance in this regard, you can contact us at http://www.hostingsewa.com/support/
Get the dedicated server hosting in Nepal offers only here
[ad_2]Advertisement