
How to Install SSL Certificate
[ad_1]
SSL certificate installation is typically taken care by the hosting provider that offers services for the domain of your website. However if you have knowledge and skills you can also install an SSL certificate yourself on your website. SSL certificates can be effortlessly installed by hosting account owners on shared server, VPS server, Dedicated hosting account. If you need any assistance or help, please feel free to contact our support team via live chat, email or phone support. Our support team can quickly guide you or even install an SSL for you if necessary. We provide free SSL with our cPanel tool and this easy to use interface gives you the aptness to generate, view as well as upload private keys, CSR and also give you the aptness to an SSL certificate on your web page instantly.
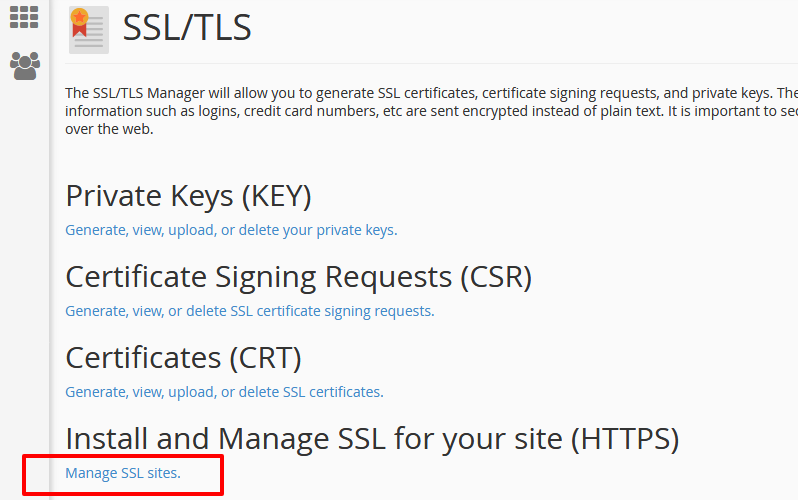
 Click on Manage SSL Sites under the Install and Manage SSL for your site (HTTPS) option.
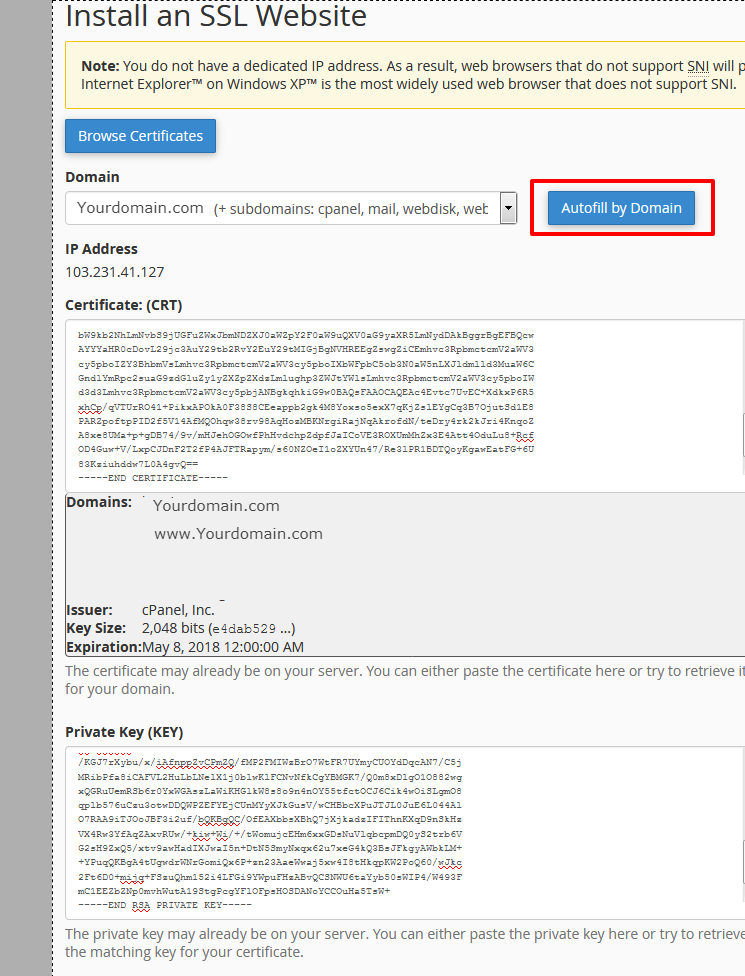
 Copy the entire certificate code you received from the certificate Authority containing -- BEGIN CERTIFICATE and END CERTIFICATE-- and enter in into the Certificate: (CRT) field on the page you entered after clicking on Manage SSL sites. You can open certificate file on your computer system using Notepad or text editor.
Note: The file containing certificate code can be found in the *yourdomainname* .crt file which is mostly provided to you by email from the certificate Authority.
Hit the Autofill by Certificate option, available next to the the CRT entered and then your domain will make an effort to collect website domain name and the private key. Additionally you also have the option to choose the domain name from the drop down menu and you can enter certificate and private key manually into the related boxes available on the page.In case the system declines to fetch the private key, you can easily locate in the Private Key area inside the SSL/TLS manager. Don’t forget to put in Begin RSA and End RSA for the certificate. In the case that private key is not available, in is suggest you to generate new CSR code along with the private key and then reissue an SSL certificate for your website.
Copy the entire certificate code you received from the certificate Authority containing -- BEGIN CERTIFICATE and END CERTIFICATE-- and enter in into the Certificate: (CRT) field on the page you entered after clicking on Manage SSL sites. You can open certificate file on your computer system using Notepad or text editor.
Note: The file containing certificate code can be found in the *yourdomainname* .crt file which is mostly provided to you by email from the certificate Authority.
Hit the Autofill by Certificate option, available next to the the CRT entered and then your domain will make an effort to collect website domain name and the private key. Additionally you also have the option to choose the domain name from the drop down menu and you can enter certificate and private key manually into the related boxes available on the page.In case the system declines to fetch the private key, you can easily locate in the Private Key area inside the SSL/TLS manager. Don’t forget to put in Begin RSA and End RSA for the certificate. In the case that private key is not available, in is suggest you to generate new CSR code along with the private key and then reissue an SSL certificate for your website.
 On this step you need to copy and paste the code of CABUNDLE into the box under Certificate Authority Bundle (CABUNDLE), if you find it empty.
In most of the situations, you do not have to supply the CA bundle code because server will automatically fetch it from public repository at the time of installation.
On this step you need to copy and paste the code of CABUNDLE into the box under Certificate Authority Bundle (CABUNDLE), if you find it empty.
In most of the situations, you do not have to supply the CA bundle code because server will automatically fetch it from public repository at the time of installation.
 Once you are done with all the steps, hit the Install Certificate button.
You will see a message stating Congratulation! The certificate is now installed on the server for your website. The website should now be accessible via https.
Once you are done with all the steps, hit the Install Certificate button.
You will see a message stating Congratulation! The certificate is now installed on the server for your website. The website should now be accessible via https.
[ad_2]
SSL certificate installation is typically taken care by the hosting provider that offers services for the domain of your website. However if you have knowledge and skills you can also install an SSL certificate yourself on your website. SSL certificates can be effortlessly installed by hosting account owners on shared server, VPS server, Dedicated hosting account. If you need any assistance or help, please feel free to contact our support team via live chat, email or phone support. Our support team can quickly guide you or even install an SSL for you if necessary. We provide free SSL with our cPanel tool and this easy to use interface gives you the aptness to generate, view as well as upload private keys, CSR and also give you the aptness to an SSL certificate on your web page instantly.
Installing an SSL on your server, using cPanel
Once the SSL certificate has been activated and issued to you by HostingSewa, you can start with the process of deploying the certificate using your cPanel control panel. Follow the below steps to install your certificate:
Click on Manage SSL Sites under the Install and Manage SSL for your site (HTTPS) option.
Copy the entire certificate code you received from the certificate Authority containing -- BEGIN CERTIFICATE and END CERTIFICATE-- and enter in into the Certificate: (CRT) field on the page you entered after clicking on Manage SSL sites. You can open certificate file on your computer system using Notepad or text editor.
Note: The file containing certificate code can be found in the *yourdomainname* .crt file which is mostly provided to you by email from the certificate Authority.
Hit the Autofill by Certificate option, available next to the the CRT entered and then your domain will make an effort to collect website domain name and the private key. Additionally you also have the option to choose the domain name from the drop down menu and you can enter certificate and private key manually into the related boxes available on the page.In case the system declines to fetch the private key, you can easily locate in the Private Key area inside the SSL/TLS manager. Don’t forget to put in Begin RSA and End RSA for the certificate. In the case that private key is not available, in is suggest you to generate new CSR code along with the private key and then reissue an SSL certificate for your website.
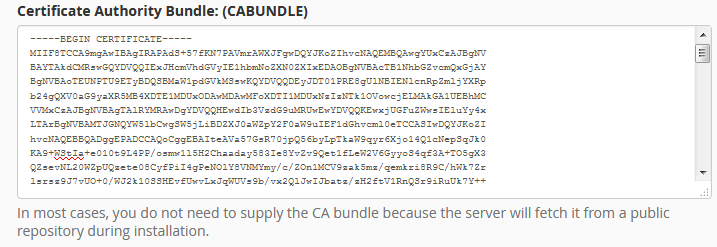
On this step you need to copy and paste the code of CABUNDLE into the box under Certificate Authority Bundle (CABUNDLE), if you find it empty.
In most of the situations, you do not have to supply the CA bundle code because server will automatically fetch it from public repository at the time of installation.
Once you are done with all the steps, hit the Install Certificate button.
You will see a message stating Congratulation! The certificate is now installed on the server for your website. The website should now be accessible via https.
[ad_2]
Advertisement