
How to find DNS nameserver from WHM Panel
[ad_1]
In this page, we will discuss how to find nameserver from the WHM panel. Before that let us understand what is Nameserver.
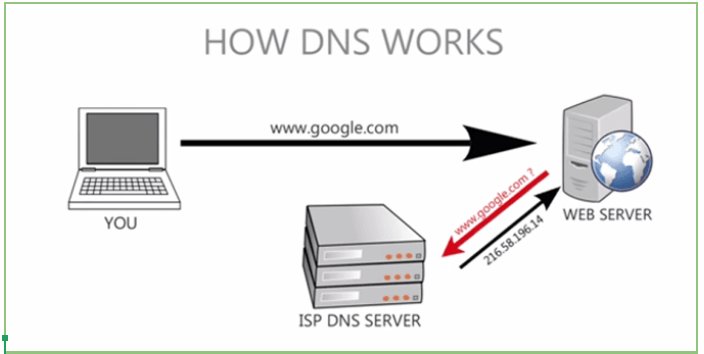
A nameserver is a component of DNS(domain name system) which allows the website to be browsed by its domain name instead of its IP address. When we type the domain name in the browser the nameserver will translate the domain into its corresponding IP address
For example, when you type the Domain name “example.com.np” in the browser, there will be a request sent to domain’s Nameserver and will return the IP address of the domain, this IP address is used by the browser to fetch the website.
Every website will have at least two nameservers, the general format of the nameserver will be ns1.namserver.com.np and ns2.nameserver.com.np where nameserver will be the name of the server. And generally, ns1.nameserver.com.np (the first nameserver ) will be the primary server and ns2.nameserver.com.np (the second nameserver) will be the backup server when the first nameserver is not responding. The nameservers are used to translate the domain name into IP address as IP address are hard for us to remember.
Step to find nameserver details in your WHM panel:
Step 1: Log in to the server using the WHM username and password through
If The Domain is not propagated you can use with https://yourserverip:2087
If The Domain is propagated you can use with http://yourdomainname:2087
Step 2: After you login into your WHM panel >> Click on DNS Functions as shown below: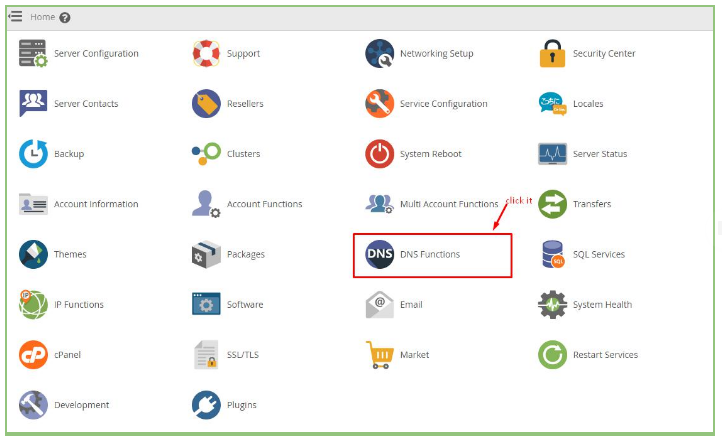 Step 3: After you click on DNS function >> Click on Edit DNS Zone as shown below
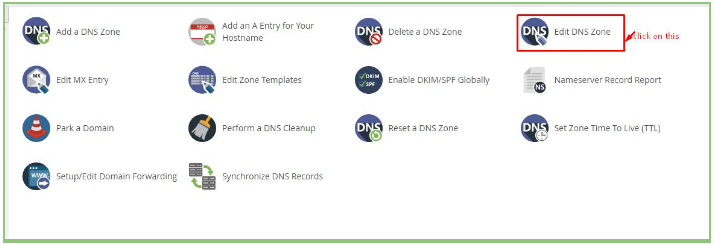 Step 4: After you click on Edit DNS Zone >> Select the domain name for which you need nameserver, and then click Edit as shown
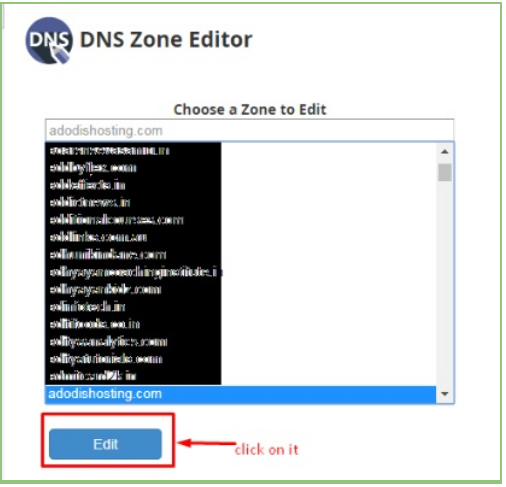 Step 5: you can see the nameserver details in the menu. For editing the nameserver details you can do it by clicking on edit on the next to the nameserver, example: For the two lines with the menu showcasing NS(nameserver details), click on edit the right-most columns to ns1.yourdomainname.com and ns2.your domain name.com which Has to be edited.
Follow the above steps to find the nameservers in WHM panel. You can add the nameservers as shown below
To Add New Records nameserver record
Step 1: You can add a new record in the below the Path section, fill the following appropriately
First field: Nameserver details or record which has to be updated eg: ns1.domainname.com
Second field: TTL(time to live - this value in IP packet which tells network router if or not the packet is there in the network and it should be discarded ) eg:14400
Third field: Record type which added eg: Select A Record
Fourth field: IP address(Enter your server's IP address)
Step 5: you can see the nameserver details in the menu. For editing the nameserver details you can do it by clicking on edit on the next to the nameserver, example: For the two lines with the menu showcasing NS(nameserver details), click on edit the right-most columns to ns1.yourdomainname.com and ns2.your domain name.com which Has to be edited.
Follow the above steps to find the nameservers in WHM panel. You can add the nameservers as shown below
To Add New Records nameserver record
Step 1: You can add a new record in the below the Path section, fill the following appropriately
First field: Nameserver details or record which has to be updated eg: ns1.domainname.com
Second field: TTL(time to live - this value in IP packet which tells network router if or not the packet is there in the network and it should be discarded ) eg:14400
Third field: Record type which added eg: Select A Record
Fourth field: IP address(Enter your server's IP address)
 Step 2: After you fill the appropriate details >> Click on Save.
Note: After you update the nameservers it will take 24-48 hours for the nameserver to reflect globally. The time taken for the nameserver to reflect globally is called DNS propagation time.
If you need any assistance, feel free to contact our technical team members as they are available 24/7 via phone call, email, ticket system or call out no 9863075120. We will be happy to help you. [ad_2]
Step 2: After you fill the appropriate details >> Click on Save.
Note: After you update the nameservers it will take 24-48 hours for the nameserver to reflect globally. The time taken for the nameserver to reflect globally is called DNS propagation time.
If you need any assistance, feel free to contact our technical team members as they are available 24/7 via phone call, email, ticket system or call out no 9863075120. We will be happy to help you. [ad_2]
Step to find nameserver details in your WHM panel:
Step 1: Log in to the server using the WHM username and password through
If The Domain is not propagated you can use with https://yourserverip:2087
If The Domain is propagated you can use with http://yourdomainname:2087
Step 2: After you login into your WHM panel >> Click on DNS Functions as shown below:
Step 3: After you click on DNS function >> Click on Edit DNS Zone as shown below
Step 4: After you click on Edit DNS Zone >> Select the domain name for which you need nameserver, and then click Edit as shown
Step 5: you can see the nameserver details in the menu. For editing the nameserver details you can do it by clicking on edit on the next to the nameserver, example: For the two lines with the menu showcasing NS(nameserver details), click on edit the right-most columns to ns1.yourdomainname.com and ns2.your domain name.com which Has to be edited.
Follow the above steps to find the nameservers in WHM panel. You can add the nameservers as shown below
To Add New Records nameserver record
Step 1: You can add a new record in the below the Path section, fill the following appropriately
First field: Nameserver details or record which has to be updated eg: ns1.domainname.com
Second field: TTL(time to live - this value in IP packet which tells network router if or not the packet is there in the network and it should be discarded ) eg:14400
Third field: Record type which added eg: Select A Record
Fourth field: IP address(Enter your server's IP address)
Step 2: After you fill the appropriate details >> Click on Save.
Note: After you update the nameservers it will take 24-48 hours for the nameserver to reflect globally. The time taken for the nameserver to reflect globally is called DNS propagation time.
If you need any assistance, feel free to contact our technical team members as they are available 24/7 via phone call, email, ticket system or call out no 9863075120. We will be happy to help you. [ad_2]Advertisement