How To Manually Install WordPress Blog on cPanel
[ad_1]
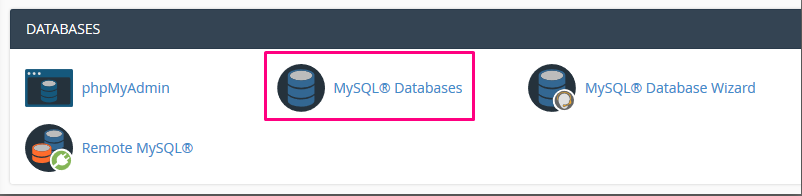
What is cPanel? cPanel is an online Linux-based Web Hosting Control Panel. The cPanel gives users a graphical interface from which they can control their portion of the Linux Server. The cPanel provides 4 tiers that, capabilities for the administrator (root), resellers and end-website users or owners to control the various aspects of website and server administrator through a standard web browser. What is WordPress? WordPress is a free web publishing software you can use to create your own website or blog. Since it was released in 2003, WordPress has become one of the most popular web publishing platforms. Today it powers more than 70 million websites! Best of all, it’s completely FREE. HostingSewa provides free WordPress setup and Installation. HostingSewa's WordPress Hosting Plans setup is extremely fast, lowest prices and best support. Installing the WordPress CMS on cPanel can be done in various ways. Although, it is always advised to install it manually as it is more secure rather than going for a one-click installation. Follow the below given steps to setup WordPress manually on cPanel. Step 1. Creating A Database Login to your cPanel account. Click on the MySQL Database which is available under Databases Section.
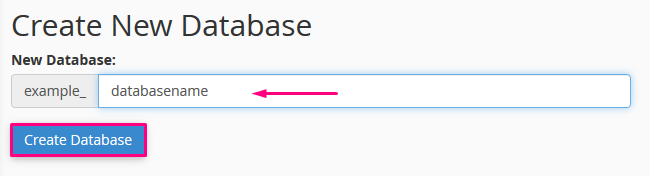
Enter your database name and click Create Database. With shared hosting account, there will be a prefix before the actual database name. After the database is created, you will be taken to a confirmation page. Click the Go Back button to return to the main databases page.
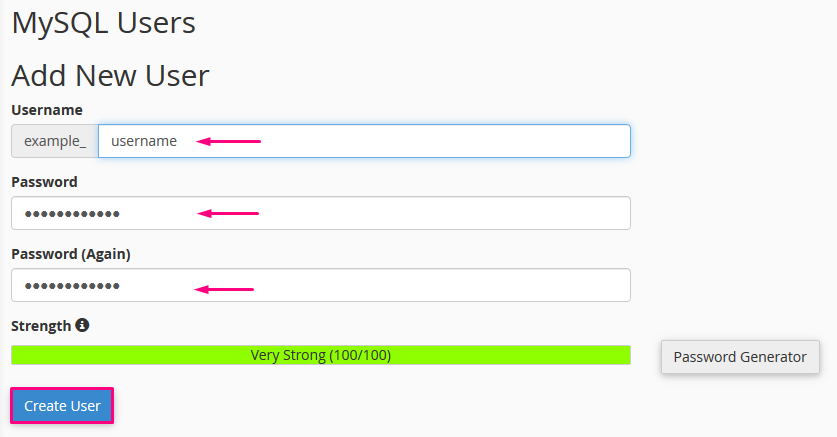
 Step 2. Creating A MySQL User
Scroll down to the MySQL Users section. The MySQL Username also included prefix before the actual database username. Enter a Username and Password (Twice) for your database user and click Create User.
Step 2. Creating A MySQL User
Scroll down to the MySQL Users section. The MySQL Username also included prefix before the actual database username. Enter a Username and Password (Twice) for your database user and click Create User.
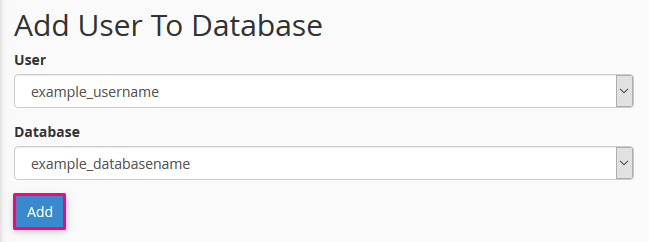
 Step 3. Adding A User to Your Database
You have to user permission to your database. Select the username and database and click Add on the Add User to Database Section.
Step 3. Adding A User to Your Database
You have to user permission to your database. Select the username and database and click Add on the Add User to Database Section.
 At the next page check the ‘All Privileges’ to assign the user privileges and click Make Changes.
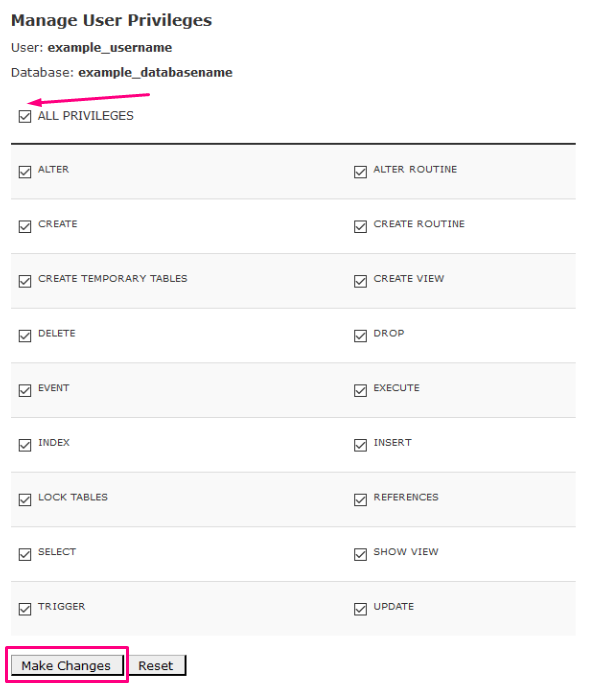 The database part is now completed. Let’s go to next Steps.
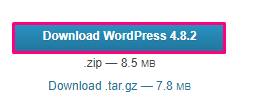
Step 5. Download the WordPress Package.
To install WordPress you need to download the WordPress Package. You can visit the WordPress download page by Clicking Here.
The database part is now completed. Let’s go to next Steps.
Step 5. Download the WordPress Package.
To install WordPress you need to download the WordPress Package. You can visit the WordPress download page by Clicking Here.
 If you're installing Wordpress to the main domain name on your website hosting providers Nepal account, use the instructions directly below.
a) WordPress ZIP file setup for Main Domain.
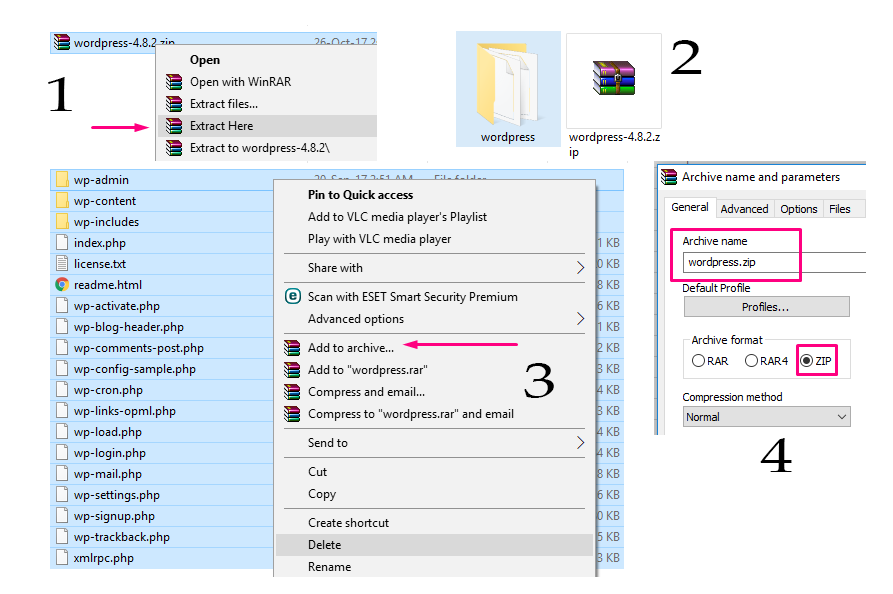
Unzip the WordPress file. You will now have a folder named "WordPress", with the Wordpress files and folders inside.
Open the main "WordPress" folder, select everything inside, and create a new '.ZIP' file so that the files or folders are no longer inside the main "WordPress" folder.
If you're installing Wordpress to the main domain name on your website hosting providers Nepal account, use the instructions directly below.
a) WordPress ZIP file setup for Main Domain.
Unzip the WordPress file. You will now have a folder named "WordPress", with the Wordpress files and folders inside.
Open the main "WordPress" folder, select everything inside, and create a new '.ZIP' file so that the files or folders are no longer inside the main "WordPress" folder.
 b) Upload the Package to your cPanel.
The upload can be done two ways; (This article shows you how to upload files via File Manager)
1) Uploading via File Manager
2) Uploading via FTP (File Transfer Protocol)
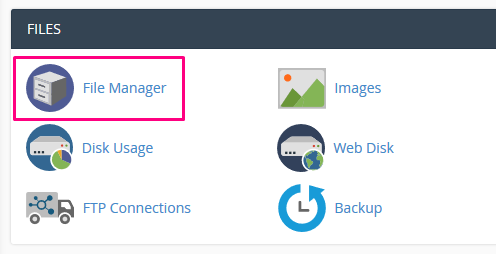
The Main Page of cPanel. Click 'File Manager' under the 'Files' Section. The File Manager will be opened in the New Window or Tab of the Browser.
b) Upload the Package to your cPanel.
The upload can be done two ways; (This article shows you how to upload files via File Manager)
1) Uploading via File Manager
2) Uploading via FTP (File Transfer Protocol)
The Main Page of cPanel. Click 'File Manager' under the 'Files' Section. The File Manager will be opened in the New Window or Tab of the Browser.
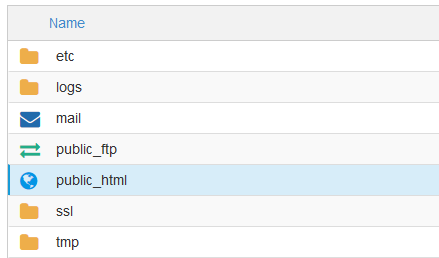
 Navigate to the “public_html” and double click to open “public_html” directory.
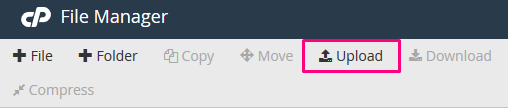
 Click the Upload button in the top row to open the file uploader in the new tab.
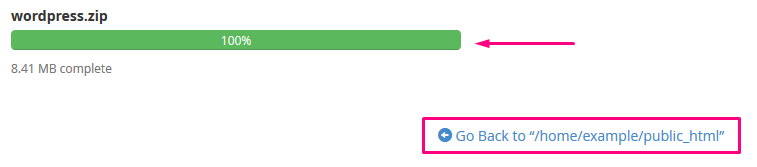
 Click the Select File to browse and select your compressed .ZIP file. You will see an upload status bar to view your file upload status in percentage. Once the file has finished uploading, click on 'Go Back' Button to close tab and go back to the file manager tab.
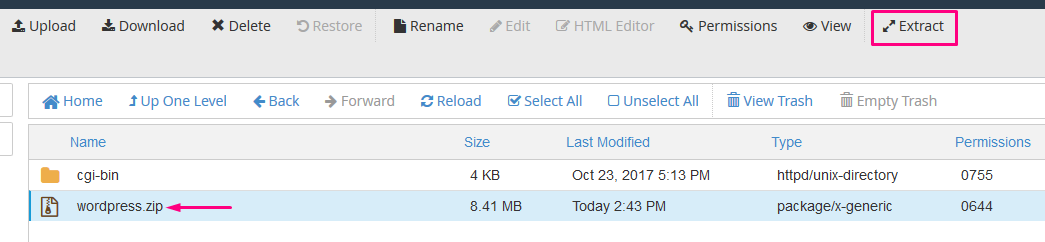
 Find the .ZIP file that you have uploaded and click extract button and select ‘public_html’ as a path for the main domain and click ‘Exact File(s)’.
 Run the Wordpress Installation
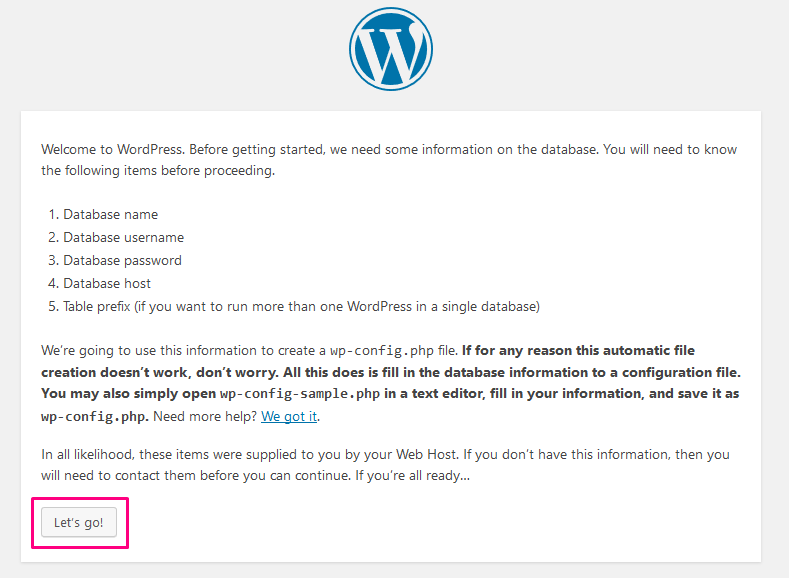
Visit www.example.com (Your website) on the browser and you will see the language selection screen. Select the language and click Continue to go for database setup.
The page will show you the WordPress list of what you need. Click Let's Go.
Run the Wordpress Installation
Visit www.example.com (Your website) on the browser and you will see the language selection screen. Select the language and click Continue to go for database setup.
The page will show you the WordPress list of what you need. Click Let's Go.
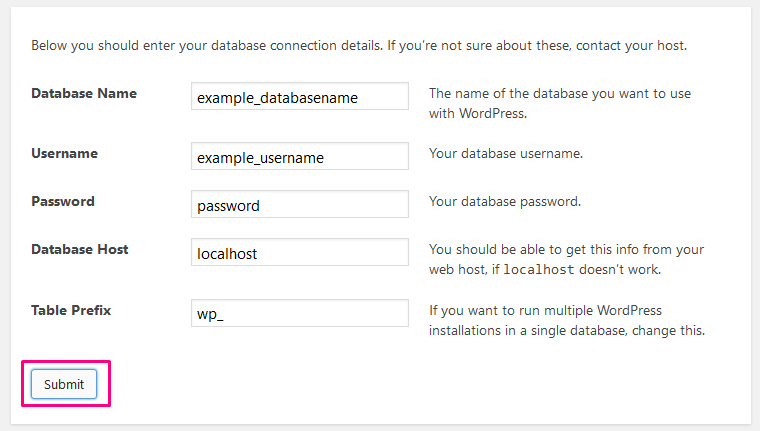
 Enter the database name, database username, and password, you have created earlier. Make sure that you have entered the database details including the username prefix.
Database Name: example_databasename
User Name: example_username
Password: ******
Database Host: Localhost
Table Prefix: wp_
One the all the details are mentioned, click on Submit button.
Enter the database name, database username, and password, you have created earlier. Make sure that you have entered the database details including the username prefix.
Database Name: example_databasename
User Name: example_username
Password: ******
Database Host: Localhost
Table Prefix: wp_
One the all the details are mentioned, click on Submit button.
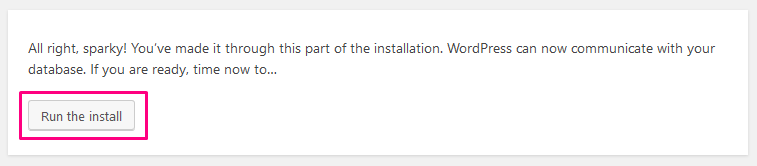
 You will see a database validation screen, the database details that you have entered are valid. If shows any error, please go back and make sure all the details are entered correctly.
Click Run the Install.
You will see a database validation screen, the database details that you have entered are valid. If shows any error, please go back and make sure all the details are entered correctly.
Click Run the Install.
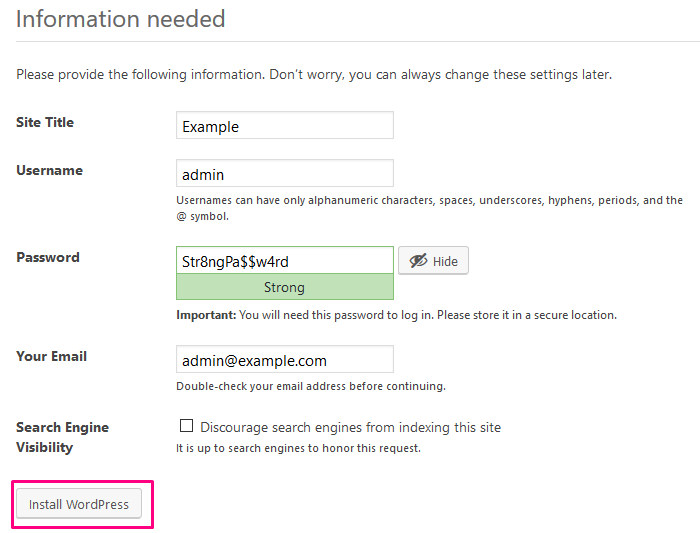
 Fill the requested details of your website and administrator login.
Site Title: Enter your website Title.
Username: Enter a Username of your WordPress Dashboard.
Password: Enter a Password of your WordPress Dashboard login.
Email: Enter a valid email address.
Click install WordPress.
Fill the requested details of your website and administrator login.
Site Title: Enter your website Title.
Username: Enter a Username of your WordPress Dashboard.
Password: Enter a Password of your WordPress Dashboard login.
Email: Enter a valid email address.
Click install WordPress.
 Wordpress is now installed!
Click the login button to log in to the WordPress Dashboard, or visit www.example.com to see your new Wordpress installation!
Wordpress is now installed!
Click the login button to log in to the WordPress Dashboard, or visit www.example.com to see your new Wordpress installation!

[ad_2]
What is cPanel? cPanel is an online Linux-based Web Hosting Control Panel. The cPanel gives users a graphical interface from which they can control their portion of the Linux Server. The cPanel provides 4 tiers that, capabilities for the administrator (root), resellers and end-website users or owners to control the various aspects of website and server administrator through a standard web browser. What is WordPress? WordPress is a free web publishing software you can use to create your own website or blog. Since it was released in 2003, WordPress has become one of the most popular web publishing platforms. Today it powers more than 70 million websites! Best of all, it’s completely FREE. HostingSewa provides free WordPress setup and Installation. HostingSewa's WordPress Hosting Plans setup is extremely fast, lowest prices and best support. Installing the WordPress CMS on cPanel can be done in various ways. Although, it is always advised to install it manually as it is more secure rather than going for a one-click installation. Follow the below given steps to setup WordPress manually on cPanel. Step 1. Creating A Database Login to your cPanel account. Click on the MySQL Database which is available under Databases Section.
Enter your database name and click Create Database. With shared hosting account, there will be a prefix before the actual database name. After the database is created, you will be taken to a confirmation page. Click the Go Back button to return to the main databases page.
Step 2. Creating A MySQL User
Scroll down to the MySQL Users section. The MySQL Username also included prefix before the actual database username. Enter a Username and Password (Twice) for your database user and click Create User.
Step 3. Adding A User to Your Database
You have to user permission to your database. Select the username and database and click Add on the Add User to Database Section.
At the next page check the ‘All Privileges’ to assign the user privileges and click Make Changes.
The database part is now completed. Let’s go to next Steps.
Step 5. Download the WordPress Package.
To install WordPress you need to download the WordPress Package. You can visit the WordPress download page by Clicking Here.
If you're installing Wordpress to the main domain name on your website hosting providers Nepal account, use the instructions directly below.
a) WordPress ZIP file setup for Main Domain.
Unzip the WordPress file. You will now have a folder named "WordPress", with the Wordpress files and folders inside.
Open the main "WordPress" folder, select everything inside, and create a new '.ZIP' file so that the files or folders are no longer inside the main "WordPress" folder.
b) Upload the Package to your cPanel.
The upload can be done two ways; (This article shows you how to upload files via File Manager)
1) Uploading via File Manager
2) Uploading via FTP (File Transfer Protocol)
The Main Page of cPanel. Click 'File Manager' under the 'Files' Section. The File Manager will be opened in the New Window or Tab of the Browser.
Navigate to the “public_html” and double click to open “public_html” directory.
Click the Upload button in the top row to open the file uploader in the new tab.
Click the Select File to browse and select your compressed .ZIP file. You will see an upload status bar to view your file upload status in percentage. Once the file has finished uploading, click on 'Go Back' Button to close tab and go back to the file manager tab.
Find the .ZIP file that you have uploaded and click extract button and select ‘public_html’ as a path for the main domain and click ‘Exact File(s)’.
Run the Wordpress Installation
Visit www.example.com (Your website) on the browser and you will see the language selection screen. Select the language and click Continue to go for database setup.
The page will show you the WordPress list of what you need. Click Let's Go.
Enter the database name, database username, and password, you have created earlier. Make sure that you have entered the database details including the username prefix.
Database Name: example_databasename
User Name: example_username
Password: ******
Database Host: Localhost
Table Prefix: wp_
One the all the details are mentioned, click on Submit button.
You will see a database validation screen, the database details that you have entered are valid. If shows any error, please go back and make sure all the details are entered correctly.
Click Run the Install.
Fill the requested details of your website and administrator login.
Site Title: Enter your website Title.
Username: Enter a Username of your WordPress Dashboard.
Password: Enter a Password of your WordPress Dashboard login.
Email: Enter a valid email address.
Click install WordPress.
Wordpress is now installed!
Click the login button to log in to the WordPress Dashboard, or visit www.example.com to see your new Wordpress installation!
[ad_2]